
What is a Guided Journey?
Let’s talk about Guided Journeys, which are a different kind of journey designed to help workers by providing step-by-step tasks. These tasks might include tutorials, company rules, or best practices.
We already know that onboarding journey tasks are assigned to users after something happens, while in contextual journeys, tasks are assigned before something is about to happen. While in Guided Journeys tasks are performed concurrently when an action is happening. Guided Journeys tasks aren’t based on specific criteria.
Imagine this: Your organization wants you to know what to do and what not to do before you take a long vacation. If you have any questions, you can look at the company’s policy documents. All of this is made easier with Oracle’s Guided Journey.
In this article, we’ll find out how to set up and use a Guided Journey. Let’s get started!
How to Enable Guided Journey?
Before you can use guided journeys, you must enable following three profile options and set their profile values to Y.
- ORA_PER_JOURNEYS_ENABLED
- ORA_PER_CONTEXTUAL_JOURNEYS_ENABLED
- ORA_PER_GUIDED_JOURNEYS_ENABLED
You can follow below navigation to update profile value
- Search for the task Manage Administrator Profile Values.
- Search for the profile option code from above list
- Change profile option value to Y
- Click on Save and Close button.
- Repeat steps for all profile options.
Log out and log back in to ensure that profile values take effect.
Steps to Configure Guided Journey
To understand the concept deeply, let’s consider this business requirement: an organization has found out that several HR specialists, when they create a talent review meeting, actually struggle to enter data as per the company-provided guidelines. The naming convention for the meeting name is not followed correctly. Newly hired HR specialists also sometimes struggle to understand the importance of each field present while creating the meeting.
To address this problem, HCM FOLKS consultancy has suggested to make use of guided journeys and recommended to do following setups.
1. Configure Checklist
For the guided journey as well we need to create a checklist, for the same follow below navigation
Navigation : My Client Groups » Quick Actions » Show More » Checklist Templates
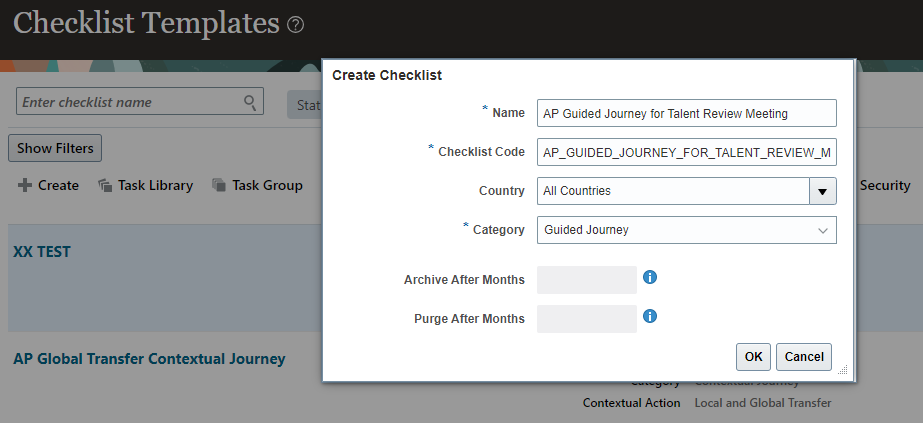
On the Checklist Templates page, click on the Create button to create a checklist and enter details as follows:-
- Name : AP Guided Journey for Talent Review Meeting
- Checklist Code : <Accept system generated code>
- Country : All Countries
- Category : Guided Journey
Once done, click on OK button which will take you to Checklist: AP Guided Journey for Talent Review Meeting page. On this page enter/update following details on General tab and click on Save button. Keep everything else unchanged to accept pre-populated values.
- Status: Active
- Date From : 1/1/1951
- Description : <Optionally enter some description>
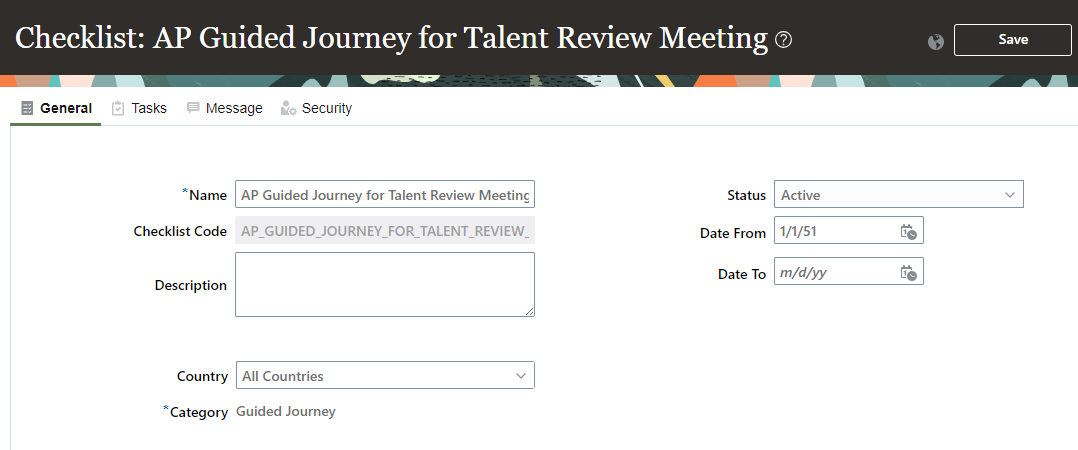
Click on Save button.
2. Configure Tasks
We have already seen how to create journeys tasks, steps to create tasks for guided journey is still the same. For this exercise we will create couple of tasks as mentioned below
2.1. Configure First Tasks
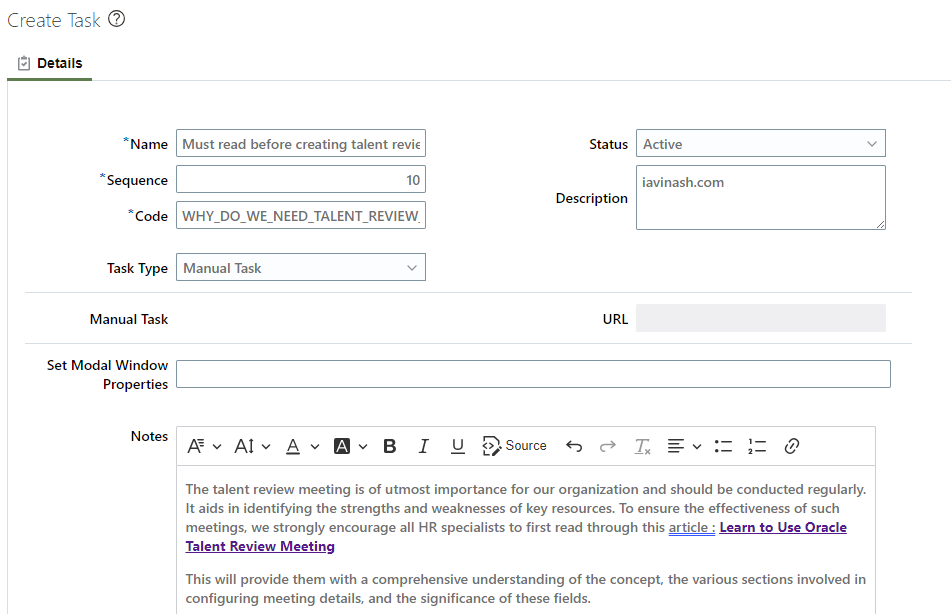
Click on the Create button to create first task for guided journey and enter details as follow
- Name : Must read before creating a talent review meeting
- Sequence : 10
- Code : <Accept system generated message>
- Status : Active
- Task Type : Manual Task
- Set Modal Window Properties : <leave Blank>
- Note : <enter following text>
The talent review meeting is of utmost importance for our organization and should be conducted regularly. It aids in identifying the strengths and weaknesses of key resources. To ensure the effectiveness of such meetings, we strongly encourage all HR specialists to first read through this article : Learn to Use Oracle Talent Review Meeting
This will provide them with a comprehensive understanding of the concept, the various sections involved in configuring meeting details, and the significance of these fields.
Before we proceed further let’s understand what we just did:
Task Type : You just clicked on this field and noticed that only limited task types are available. This is because guided journey is to provide guidance to worker when they perform any action therefor no complex application tasks are available. You also need to understand that except questionnaire task type, all other task types used in guided journeys are read-only type tasks which means they don’t save any data anywhere. For questionnaire responses are stored in the PER_CHK_GUIDED_RESPONSES questionnaire tables.
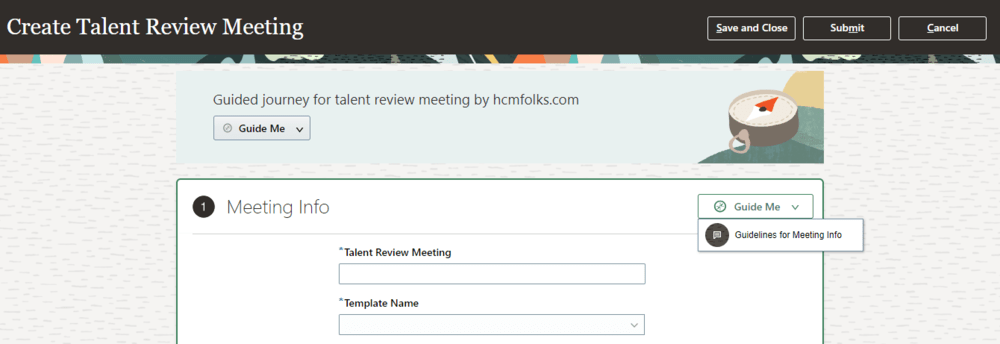
Set Modal Window Properties : When you create a guided journey you see a modal window which contains a small Guide Me button as shown below and when you click on this, it lists down all journeys tasks configured and enabled for Guided Journeys.

Through Set Model Window Properties field we can control width, height and some other properties of this model window. Below is the list of properties we can use.
- Width : Using this property we can set width of the modal window in pixels. The default value is 500.
- Height : Using this property we can set the height of the modal window in pixels. The default is 350.
- Modal : Using this we can choose to have type of window. Attributes are Y or N. Y indicates modal window and N indicates non-modal window.
- Resize : The gives option to resize model window. Attributes are Y or N. Y indicates users can resize the window.
You can separate value of each field using semi colon (;). If we are not passing any value means, we are passing this default value : width=500;height=350;modal=Y;resize=Y
You can play around with these values by passing different values for each task.
Notes : As this was a manual task, it is important to enter some text in the notes section, which will be visible to worker.
Once you enter all details mentioned above, click on Save and Close button, which will take you back to Checklist: AP Guided Journey for Talent Review Meeting page.
2.2. Configure Second Tasks
Click on the Create button to create next task for the guided journey and enter details as follow
- Name : Guidelines for Meeting Info
- Sequence : 20
- Code : <Accept system generated message>
- Status : Active
- Task Type : External URL
- URL : https://hcmfolks.com/add-question/
- Set Modal Window Properties : <leave Blank>
- Note : <enter following text>
Meeting Info serves as the initial section for creating a Talent Review meeting, where it’s imperative to input the meeting name in the following specified format:
<DEPT_NAME – BUSINESS OWNER NAME – MEETING DATE>.
Should you have any concerns or questions, please don’t hesitate to share them within the internal community.
Once you enter all details mentioned above, click on Save and Close button, which will take you back to Checklist: AP Guided Journey for Talent Review Meeting page.
2.3. Configure Third Tasks (Optional)
You can create one more task of any task type you are comfortable with. Once you enter all details, click on Save and Close button, which will take you back to Checklist: AP Guided Journey for Talent Review Meeting page.
3. Preview Configures Tasks (Optional)
On the Checklist: AP Guided Journey for Talent Review Meeting page, you see a new Preview button, which is exclusively available for guided journeys. You can click on this and select tasks we have configured to check how they would appear in the guided journeys.
3. Complete Remaining Configurations
Next click on the Message tab and enter details as follows. Remember this is optional step.
- Title : Guided journey for talent review meeting by hcmfolks.com
- Upload Background Image : Upload an image
Once done, click on Save and Close button.
With this you have completed tasks to configure Guided Journeys, however, this is not yet available on talent review meeting to start guiding HR specialist. We need to enable it for them using personalization (Transaction Design Studio)
4. Enable Guided Journey using TDS – Transaction Design Studio
Follow below navigation to create a sandbox
Navigation : Configurations » Sandboxes
On the Sandbox page click on Create Sandbox button and enter details as follows
- Name : AP Enable Guided Journey for TRM
- Publishable : Yes
- Tool : select tool HCM Experience Design Studio
Click on Create and Enter button. From the yellow banner on the top, click on Tools and select option HCM Experience Design Studio.
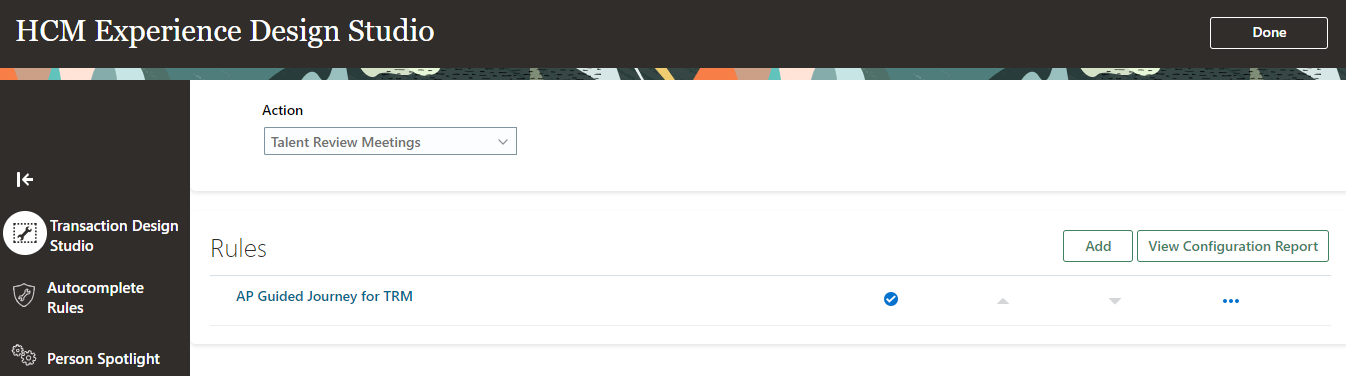
You are on HCM Experience Design Studio page. From the left panel, click on the option Transaction Design Studio, this is also popularly known as TDS.
While TDS is still selected, click on the Action field and select option Talent Review Meetings from the list.
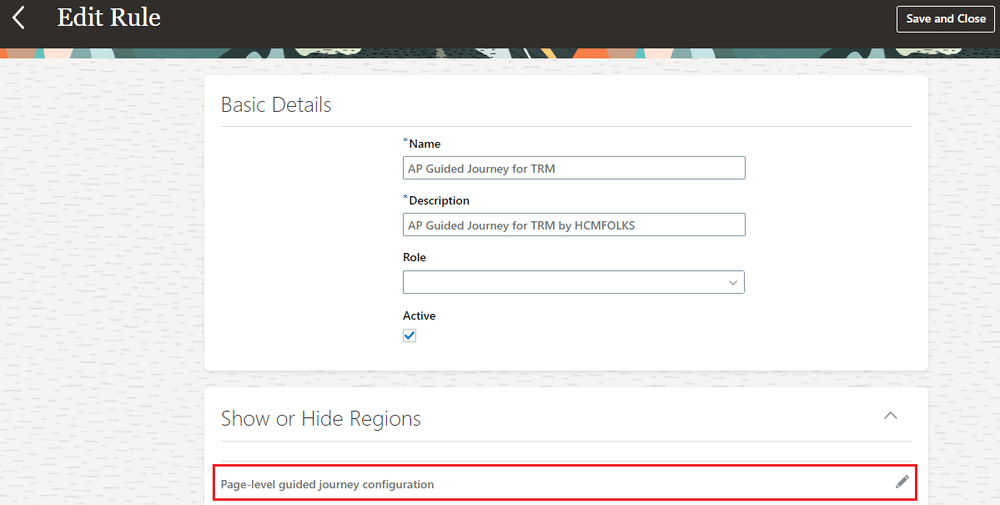
Click on the Add button in the Rules section. You will be on Edit Rule page. On this page enter following details in the Basic Details section.
- Name : AP Guided Journey for TRM
- Description : AP Guided Journey for TRM by HCMFOLKS
- Role : Here you get option to enable this rule for any specific role only but we want to enable guided journey for all roles so leave the field blank.
- Action : Yes, otherwise what is the point of all these efforts
4.1 Enable Guided Journey at Header Level
Once done scroll below to Show or Hide Regions and click on Edit icon against entry Page-level guided journey configuration and enter details as follows
- Guided Journey : AP Guided Journey for Talent Review Meeting
- Task : Here you get option to select all tasks we have configured earlier. No one is restricting to select all tasks but for this exercise select first task that is Must read before creating talent review meeting
Click on Done button. With this we have enabled Guided Journey for talent review meeting at header level. However, talent review meeting page also allows to enable guided journey at section level also, which is not available for all HCM flow, then why dont we take opportunity to explore this option as well.
4.2 Enable Guided Journey at Section Level
In the Show or Hide Regions click on Edit icon for the row Meeting Info and enter details as follows.
- Guided Journey : AP Guided Journey for Talent Review Meeting
- Task : Guidelines for Meeting Info
Click on Done. Likewise, you can create Guided Journey task for following sections also
- Review Content
- Review Participants
- Population Section
- Review Population
Once done, scroll up to the top of page and click on Save and Close button. You will be redirected back to HCM Experience Design Studio page. On this page perform following steps
- Click on TDS from the left panel
- Click on Action field and section option Talent Review Meetings.
- Ensure that rule AP Guided Journey for RTM we configured is available in the Rules section.
Click on Done button. On the top yellow banner, click on the sandbox name AP Enable Guided Journey for TRM, and select option Publish. Click on Yes on the confirmation dialog box. Click on Publish button once again to publish the sandbox. Log out and log in back as an HR specialist.
With this we have now also enabled guided journeys on talent review meeting page. Next we will explore how it works.
5. Explore Guided Journeys
To explore guided journeys functionality we have configured for Talent Review Meeting, login as an HR specialist and follow below navigation to create a Talent Review Meeting
Navigation : My Client Groups » Talent Review
On the Talent Review Meetings page, click on the + Add button, which will take you to Create Talent Review Meeting page. On this page, you will see the guided journey we have just configured, for any reason if you dont see the journey, click on Cancel button and click back on +Add button.
You will see a Guide Me button on top of the page (header section) and if you click on that you will see first task that we configured – Must read before creating talent review meeting
If you scroll below to Meeting Info section, you will see section level guided journey task – Guidelines for Meeting Info. If HR specialists click on this task, they will find company guidelines to fill up details in this section. This will solve company issue which we described initially.
Likewise, if you scroll below to other sections, you will see Guide Me button wherever you have enabled it using TDS.
Questions on Guided Journeys
Hope you have followed steps mentioned in this article step by step to successfully configure guided journeys in your pod. If you are facing any issue or have any questions, please ask your question now.
You can learn about contextual journeys here » Learn To Configure And Use Oracle Contextual Journeys