
What is a Contextual Journey?
We have already learned what are journeys and different types of journeys delivered by oracle cloud application. We have seen in an onboarding journey that set of tasks are performed after an action has occurred (for example Hire) While in contextual journey set of tasks are performed before an action is about to happen. For example, you want all your managers to perform series of tasks before they transfer their employees from one department to another. Similarly, you may want your employees to perform different set of tasks when they add an absence.
A contextual journey allows you to define list of tasks that different stake holders perform before a quick action (HR Transaction) is initiated.
In this article we will learn to configure a contextual journey for line managers when they initiate legal employer transfer through action Local and Global Transfer.
How to Enable Contextual Journey?
Before you can use contextual journeys, you must enable following two profile options and set their profile values to Y.
- ORA_PER_JOURNEYS_ENABLED
- ORA_PER_CONTEXTUAL_JOURNEYS_ENABLED
You can follow below navigation to update profile value
- Search for the task Manage Administrator Profile Values.
- Search for the profile option code : ORA_PER_JOURNEYS_ENABLED
- Change profile option value to Y
- Click on Save button.
- Search for the profile option code : ORA_PER_CONTEXTUAL_JOURNEYS_ENABLED
- Change profile option value to Y
- Click on Save and Close button.
Log out and log back in to ensure that profile values take effect.
Steps to Configure Contextual Journey
Before we start configuring contextual journey for Local and Global Transfer action, login as a manager and follow any of the navigation mentioned below :
Navigation : My Team » My Teams » Click on Action menu against any employee » Select option Local and Global Transfer from the list of available actions » Click on Cancel button
Navigation : My Team » Quick Actions » Show More » Click on Action Local and Global Transfer under Employment section » Click on any employee name available under Direct Report section » Click on Cancel button
In this entire navigation you just followed, you didn’t find any journey task (unless there is something already configured in your pod), this is because we haven’t configured journey tasks yet for this action.
Log out as a line manager and login back as an implementor and follow below navigation to start configuration steps for contextual journeys.
Navigation : My Client Groups » Quick Actions » Show More » Checklist Templates
1. Configure Checklist
On the Checklist Templates page, click on the Create button to create a checklist and enter details as follows:-
- Name : AP Global Transfer Contextual Journey
- Checklist Code : <Accept system generated code>
- Country : All Countries
- Category : Contextual Journey
- Archive After Months : 12
- Purge After Months : 15

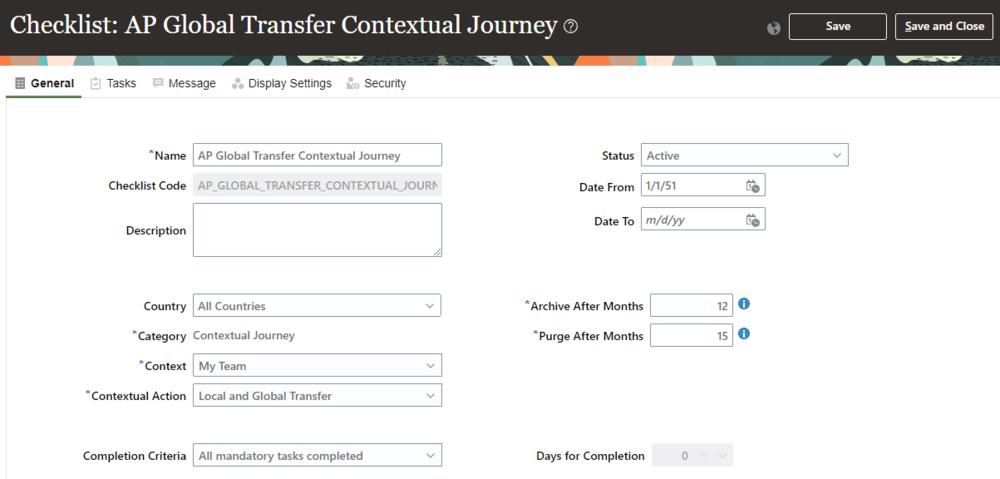
Once done, click on OK button which will take you to Checklist: AP Global Transfer Contextual Journey page. On this page enter/update following details on General Tab and click on Save button. Keep everything else unchanged to accept pre-populated values.
- Status: Active
- Date From : 1/1/1951
- Context : My Team
- Contextual Action : Local and Global Transfer
- Completion Criteria : All mandatory tasks completed
When you click on context filed you see following three options to configure your contextual journeys
- Me : This is used if you want to set task for employees
- My Client Groups : This context is used if you want to display contextual tasks to HRs
- My Team : Use this option when you need to set tasks for line managers.
Once you select Context, you get option to choose, Contextual Action, where you get list of different actions on which you can configure your contextual tasks, as of now, you can select only one action from the list, currently not all actions are supported but you do get most frequently used actions.
Since our requirement is to set tasks for line manager before they initiate Local and Global Transfer we have following configurations in place
- Context : My Team
- Contextual Action : Local and Global Transfer
Click on Save button.
2. Configure Criteria (Optional)
On the Checklist: AP Global Transfer Contextual Journey page, scroll down to Configure Criteria section. This section allows you to contextualize your journeys tasks a bit further. If you do not configure anything in this section, all your journey tasks will be available to managers when they initiate Local and Global Transfer for any employee, but let’s say journeys tasks should be applicable only when a manager initials local and global transfer for employees who are in Consultant job. Our configurations steps would be as follows:-
- Click on the Add button in the Configure Criteria section.
- Click on the Edit Condition (pencil) icon for a newly added criteria in the Configure Criteria section.
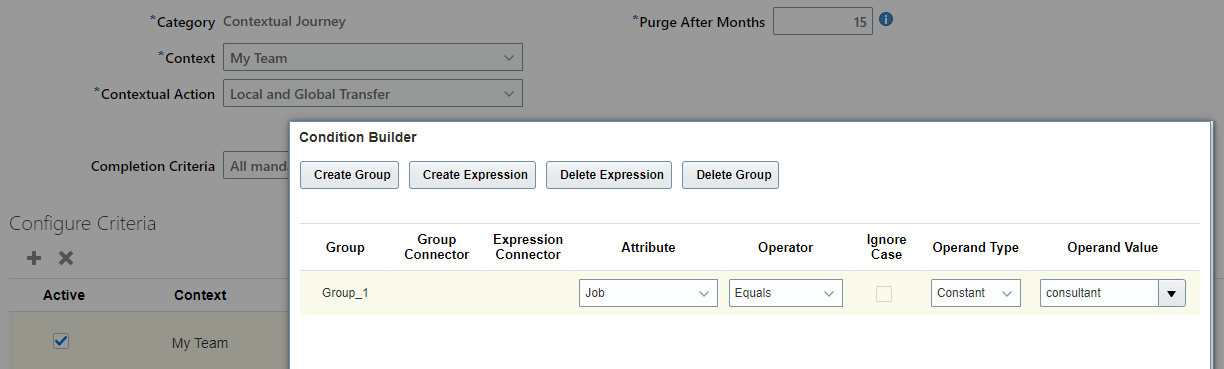
- Click on Create Group button in the Condition Builder pop-up window.
- Click on the Attribute filed and select value Job for the first group that is Group_1.
- Keep the Operator filed unchanged to Equals.
- Ensure Operand Type is set to Constant.
- Change the Operand Value to consultant <select any other value if you don’t find this in your pod>
You can click on the Create Group button again to add another criteria, otherwise click on OK button. You will be back to Checklist: AP Global Transfer Contextual Journey page.
You can click on the Delete button to delete the criteria we have just configured or uncheck the Active checkbox to inactive the criteria. If you are not deleting or inactivating the criteria, you must ensure you have some employees who satisfy these criteria so that you can test contextual journey later in this article. If you want to keep things simple, you may delete or inactive criteria.
Whatever the case may be, click on Save button.
3. Configure Tasks
We have already seen how to create journeys tasks, steps to create tasks for contextual journey is still the same. Click on the Create button and create couple of tasks for managers to perform when they initiate Local and Global Transfer for employees.
Only difference you will notice for the contextual journeys tasks is that you see a Configure Criteria section even when you configure individual tasks. Concept to create these criteria is same as explained earlier.
4. Complete Remaining Configurations
Once you have configured couple of tasks (even one manual task will also do), click on the Message tab and enter required details something as follows
- Title : Complete Task before your transfer employees
- Welcome Text : Welcome to iavinash.com
- Upload Background Image : Upload an image
Once done, click on Save and Close button.
With this you have completed tasks to configure contextual Journeys, we will next see how it works.
Verify Contextual Journey
Login as a line manager and follow any of the navigation below which was shared earlier
Navigation : My Team » My Teams » Click on Action menu against any employee » Select option Local and Global Transfer from the list of available actions
Navigation : My Team » Quick Actions » Show More » Click on Action Local and Global Transfer under Employment section » Click on any employee name available under Direct Report section
You will notice that contextual journey that we configured earlier is visible to the line manager, at this point of time line manager can click on the Start This Journey button to assign journey to himself or can click on the Continue Without Journey button to ignore journey tasks and process as usual with Local and Global Transfer action.
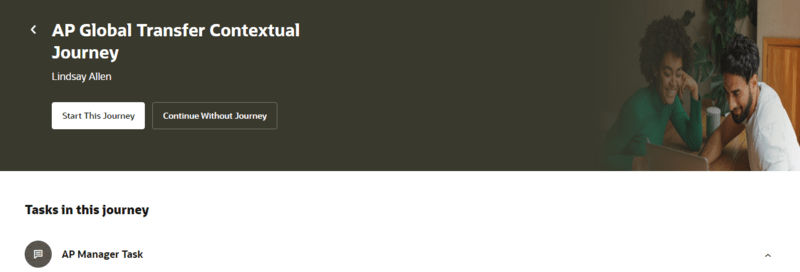
If manager clicks on the Start This Journey button all the tasks from that journey will be assigned to manager and will be available in the section Tasks I need to do.
Once manager completes all required tasks within that journey, he can follow the Local and Global Transfer action again for that employee and this time he can click on Continue Without Journey to proceed with transfer.
Questions on Contextual Journeys
Hope you have followed steps mentioned in this article step by step to successfully configure contextual journeys in your pod. If you are facing any issue or have any questions, please ask your question now.
You can learn about Guided Journey here » Learn To Configure And Use Oracle Guided Journeys